29 June 2009

Mandarin Chicken Salad

When the weather takes a turn for the unbearably, beastly, suffocatingly hot here in Florida (right around the end of June) I start making a lot of salads, soups, stews, and sandwiches--anything to give the oven a break and not heat up the house. You think I left out grilling, right? Because this is the season when America collectively lights up their grills and throws on their hot dogs, ribs, hamburgers, and marinated chicken. Not here. The very last thing you want to do outside when it is 93 with a 104 heat index is stand over an open flame. Okay, we are going to have some BBQ this week, but that's just smoking and poor Bubba can close the lid and walk away for a while.


This recipe for mandarin chicken salad is super quick, easy, and extremely tasty. Best of all, it is also super filling. We didn't even want dessert afterward. Shocking, I know.

You will need:

lettuce (you choice of variety, I use a mix of iceberg and Romaine)
sweet and sour sauce/marinade
1 can mandarin oranges
slivered almonds
chow mein noodles
4-6 boneless, skinless chicken breasts


I cleaned and cut up the chicken breasts into three pieces each (I used 6 breasts) and put them all in a Ziploc bag. I added 1/2 - 3/4 of the bottle of sweet and sour sauce. Chuck the bag into the fridge and leave it alone for at least 3 hours, overnight is best. **Store the leftover bottle of sauce in the fridge if you are leaving the chicken overnight**

I use a sweet and sour sauce that is much thinner than a traditional dipping sauce. It is more of a marinade than a sauce, really. I would not try using that ultra thick dipping sauce...I don't think it would coat the chicken properly and would probably burn when cooking owing to the high sugar content. My favorite marinade for this recipe is:


Your choice on how to prepare the marinated chicken. I sprayed a frying pan with cooking spray and cooked the chicken on medium high heat for 4 minutes on each side. But you could definitely grill them or even bake them (350 degrees for 20-25 minutes). It really won't make too much of a difference, unless you love that grilled flavor. :)


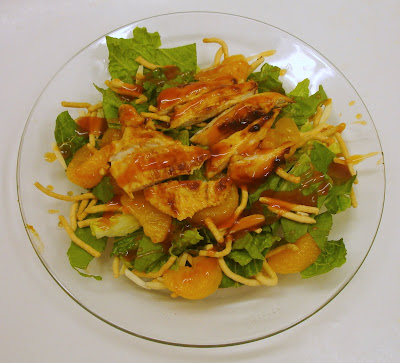
After the chicken is cooked, grilled, baked it is just a matter of putting together the ingredients on a bed of lettuce. I add about a handful of chow mein noodles per plate, about a tablespoon of almonds, a handful of oranges, and at least 3 pieces of chicken (equaling one chicken breast). For the dressing, I thin out some of the sauce with a bit of white vinegar. The bite of the vinegar cuts the mild sweetness of the sauce perfectly. For all four of us I used 1/4 cup of sauce and 1 tsp of vinegar total. You need very little dressing on this salad, just a drizzle.


How crazy tasty are those chow mein noodles. I could eat them like potato chips...and did. The whole family loves, loves, loves this salad. Make a little extra chicken so you will have leftovers. This chicken is amazing when eaten right out of the fridge, cold with a little bit of salt. Even better when standing in the kitchen eating it with your fingers. Enjoy!

23 June 2009

Key Lime Pie

One of the best parts of living in Florida, besides the sunshine, is the availability of true Key Lime Pie. And by true I mean YELLOW. Key Lime Pie is never green; it's never fluffy or whipped. To make this pie you will need actual key lime juice, not regular lime juice. There is a huge difference. Yes, I'm a Key Lime Pie snob, but I live in Florida and it is sort of encouraged. :)

You will need:

1/2 cup key lime juice
1/3 cup powdered sugar
1 can condensed milk
3 egg yolks
1 graham cracker crust


If you can't find true key lime juice in your local store (or even better, key limes), you can order it online. Nellie and Joe's Key Lime Juice is the best.


Key Lime juice is darker and thicker than regular lime juice and it has a tarter, stronger flavor.


Mix all of your ingredients, except the crust, and whisk for two minutes on medium speed. Then pour into your pie crust.


Bake at 350 degrees for just 15 minutes. You do not want your pie to brown at all. It comes out looking not much different than when it went into the oven.


Cool to room temperature and then chill in the fridge until you are ready to eat it. Top with real whipped cream. Please don't desecrate the beauty of true Key Lime Pie with Chemical Whip.


Simple, quick, the perfect summer dessert. Enjoy!

22 June 2009

Pecan Chicken

Pecan chicken is a classic Southern dish traditionally made with bone-in, skin-on chicken. Like fried chicken, but with a pecan (pronounced pee-can in the South) crust. This recipe is a healthier version I found in one of my favorite cookbooks and then made even healthier.


You will need:

2 pie plates
9x13 baking dish
3T butter (Smart Balance)
3/4 cup lowfat buttermilk
1 egg
1 cup flour
1 cup ground pecans
1 T paprika
1/2 tsp salt
1/2 tsp pepper
6 boneless, skinless chicken breasts


Clean your chicken and cut the breasts into 3 pieces each, about the size of chicken tenders. You can leave them whole, but the smaller pieces have more coating, so more flavor, and they cook faster. Kids love anything that resembles a chicken tender.


Preheat your oven to 375 degrees. I covered my glass baking dish with foil for easy clean-up. Cut up the 3T of butter and put them in your baking dish, then place the dish into the oven while it preheats.


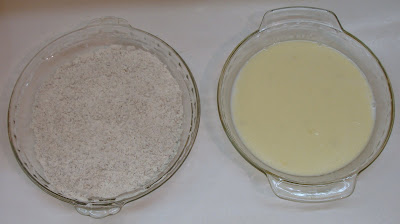
Mix the pecans, flour, paprika, salt, and pepper in one of the pie plates.


In the second pie plate, whisk together the buttermilk and egg. Line up your dishes starting with the buttermilk mixture, then flour, then melted butter in the baking dish.


Dredge each piece on chicken in the buttermilk mixture, coating it thoroughly.


Then evenly coat each buttermilk covered piece in the pecan mixture.


Place each piece in the dish with melted butter, then flip over so that it is buttered on each side.


Mmmmm. Buttermilk, pecans...two of my favorite words. I'm getting hungry!

Bake at 375 for 25-30 minutes. The coating will brown up nicely.


This chicken is amazing hot from the oven. I served it with some saffron rice and homemade whole wheat rolls (recipe to come). But, my favorite way to eat this chicken is cold from the fridge, cut up on a salad. Hot or cold it's super delicious and almost guilt-free. Enjoy!

17 June 2009

Macaroni Stew

This recipe is so simple and so flavorful. Tomato allergy or not, it is one of my all-time favorites and I always brave the stomachache and eat some. You can make this stew on the stove or in the slow cooker. And like chili, it's even better the next day!

You will need:

1 pound lean ground beef or turkey
1 medium onion
1 cup chopped carrots
2 cans green beans
1 cup (or 1 can) corn
1 small can tomato sauce
1 small can tomato paste (I like the kind with roasted garlic)
1 envelope Lipton onion soup
2 cups water
salt and pepper to taste
********************
8 oz cooked elbow macaroni


Saute the meat with the onion and carrots until all traces of pink are gone from the meat. If you meat is super lean, you might need to add 1T of oil. (My carrots look strange because all I had were those matchsticks carrots for salads. Someone--and I won't name names--ate all my baby carrots.)


Stir in the rest of the ingredients, except the macaroni. Do not drain the canned veggies.


Bring to a boil and then lower the heat. Cover and simmer for at least an hour, but the longer the better.


If you plan on eating the entire pot in one night, then you can add the macaroni to the pot. If not, then add a handful of macaroni to each bowl before topping with stew. Pasta has an annoying habit of swelling and then breaking down in the stew pot. The stew will be nice and hot and will warm the macaroni immediately.


Stir and enjoy! (Ignore the magically changing bowl...I forgot to take a picture in the white bowl before hubby started chowing down.)

14 June 2009

Strawberry Lemonade

I had a request to post summer recipes and strawberry lemonade, for me, epitomizes summertime. Tart, refreshing, ice cold...nothing tastes better on a hot summer afternoon. Especially when paired with a hot dog, burger, or a big plate of barbecue.


You will need:

a large pitcher
6 cups water
6-12 lemons (enough to make 1 1/2 cups juice)
10 oz. frozen strawberries, thawed and pureed
sugar to taste


I started with 12 lemons, but ended up only using 6. The number of lemons depends entirely on how juicy they are. Your lemons should be room temperature then give them a roll between your hands or on the counter. I used a juicer, but you can juice the lemons by hand--it will just take longer.


The juicer does a great job of getting every last bit of lemon and strains the bigger pieces of lemon meat and all the seeds. I don't strain all of it, though, because I love pulpy lemonade. (With orange juice I like the pulp so heavy you can practically chew the juice.)


Six lemons gave me just shy of 1 3/4 cups of juice.


While I was juicing the lemons I added 1/2 cup of sugar to the water to let it dissolve. Add your lemon juice to the sugar water.


I thought the plate full of juiced lemons made such a pretty picture...I couldn't
resist. :)


I used a mini food processor to puree the strawberries.


I used half of a 16oz bag of frozen strawberries and got just a little more than 9oz of puree. This recipe is not an exact science.


Mix into your lemonade and stir. If you don't like bits of strawberry and strawberry seeds you can strain your puree before adding. But I love all of the bits of fruit. Keep tasting and adding sugar until it's as sweet as you like. I ended up adding maybe another 1/4 of a cup or so, for a total of 3/4 of a cup of sugar. I like tart lemonade and the strawberries added quite a bit of sweet flavor. (If you like artificial sweeteners, like Splenda, then you will need to add a lot less than 3/4 cup. Just keep tasting and adding in small amounts.)


The flavors ripen the longer it sits, so if you can wait put the lemonade in the fridge and let leave it alone for a few hours. Stir and enjoy!!

12 June 2009

Monkey Bread

This recipe is so much fun for the weekend. Quick, simple, and so, so good!

You will need:

One bundt pan
3 (12oz) cans of refrigerated biscuits
1 cup white sugar
3 tsp cinnamon
1 stick butter (Smart Balance)
1 cup brown sugar (light or dark)

optional: 1/2 cup walnuts or raisins (I don't add either)


Mix the white sugar and cinnamon in a bag or bowl. Cut each biscuit into fourths and drop into bowl/bag of cinnamon sugar. Kitchen shears work really well for cutting up the biscuits. It also helps to have a little monkey give you a hand. Kids love to get their hands messy.


After they are coated with cinnamon sugar, drop the biscuits into a heavily greased bundt pan.


Set aside. Place the 1 cup of brown sugar and 1 stick of butter into a small pot and melt over medium heat.


Bring to a boil and stir continuously for one minute.


Pour over biscuits in bundt pan.


Bake for 25-30 minutes at 350 degrees.


After removing from oven, immediately invert the pan onto a plate. A standard dinner plate works great. You should not have any sticking at all.


If you can stand to wait, let it cool for a couple of minutes. If we make it two minutes before cutting into it I am impressed. The biscuits puff up and the syrup coats every piece, along with the cinnamon sugar. Mmmmmm.


We rarely have leftovers, but when we do I store them in a ziploc bag on the counter overnight. If you want to heat up the leftovers, give them about 30 seconds on half power. The reduced power keeps them from hardening when reheating. Enjoy!!

11 June 2009

Whole Wheat Pizza Dough

Pizza is so cheap and ubiquitous that most people never bother making pizza dough from scratch. Once you start making your own dough, you'll realize how much better it tastes! When I first starting making homemade dough (and after much trial and error) I used this recipe from Tyler Florence. It's my good-to, never-fail recipe when I want all white flour pizza dough. But, more often I use a whole wheat/white flour mix. This recipe is fantastic. Super tasty and you can add more or less whole wheat to your liking. I don't recommend using all whole wheat, though. The crust comes out too dense and you loose the chewiness. Adding the white flour will keep your crust light. That said (written), if you do decide to use all whole wheat you will need to add 4 tsp of gluten, which will add a bit of chewy and will help the dough rise.

You will need:


1 tsp white sugar
1 1/2 cups warm water (110 degrees)
1 package active dry yeast
1 T olive oil
1 tsp Kosher salt
2 cups whole wheat flour
1 1/2 cups bread flour

(I only use King Arthur flours. If you use another brand you may need to adjust your flour quantities just a bit. But...King Arthur really is superior!)

In a large mixer bowl (I use my KitchenAid) add the water, sugar, and yeast. The sugar feeds the yeast (little burpee guys). Add a bit more sugar if you like a sweeter crust. After the mixture is foamy--about 10 minutes--add the oil and salt.


Mix gently and then add the whole wheat flour and 1 cup of the bread flour.


Use the dough hook attachment and mix until dough starts to come together.


At this point you can either turn out the dough onto a surface floured with the remaining bread flour or you can, like I do, leave it in the mixer and slowly add the remaining flour with the mixer on medium speed. You'll need to stop it now and then to scrape the dough off of the hook.


If kneading by hand, keep it up until all of the flour is absorbed and the dough becomes smooth. About ten minutes or so. If you are using the mixer, mix for at least six minutes. Dough should be smooth and elastic.


Place the dough in an oiled bowl, turn to coat, and loosely cover with a damp towel. Let it stand in a warm place until doubled, about an hour. I turn on the oven to 400 degrees and put the bowl at the back of the stove with one half of the towel over the back burner.


After it rises...


punch it down and turn it out onto a floured surface.


This dough is so great. You can divide it into 2 and have two great, thick, large crusts. Or you can divide it into 3 and have thinner crusts, but still nice size pizzas. I divide it into 4 and have individual pizzas for each family member. The dough is thin, but not the flat thin you get at a pizza parlor--the one that makes you think you are eating cardboard or paper. Form the pieces into little balls and leave them alone for about 45 minutes or until doubled.


Preheat the oven to 425. You can use a rolling pin to form your crusts, but I just stretch and pull at them until flat. I like the look of homemade pizza crust, not perfectly round.


Top with anything you like! Bake on a greased pizza pan or cookie sheet for about 12 minutes.. My pizza pan is blackened and malformed owing to years of being spread with pulled pork and cooked on the grill, so I just use a cookie sheet lined with parchment and greased with a bit of olive oil. Works great, but still every year I ask Santa for a pizza stone. For some reason, he always forgets to bring me one. :)


Tinker Bell likes tomato sauce, mozzarella, pepperoni and green peppers on her pizza.


Bubba, Goose, and I like BBQ sauce (thinned with a bit of pineapple juice), BBQ chicken, bacon, and pineapple on our pizzas.


Even in smaller, individual size crusts the dough is chewy, not too dense, and thick enough to let you taste it. Give it a try and you won't be sorry!