This recipe is a variation of the one on the back of the Libby Pumpkin can (not the pumpkin pie filling). It started with my father-in-law who always makes two pumpkin pies at a time, so he doubles the recipe. He thought he had two cans of evaporated milk, but only had one and one can of condensed milk. He used both and a better pie was born. (I never liked pumpkin pie until I tried his version and now it is one of my favorites.) I took it one step further by upping the cinnamon, ditching the cloves, and switching the white sugar for brown. The hint of molasses makes quite a difference. SO yummy!
This year Goose made the pies. Since this recipe makes two pies, you can give one away as a gift or (like our family) eat pumpkin pie for breakfast and dessert for over a week. :) They don't freeze well, though. Always make your pies the day before the holiday. Pumpkin Pie is best served chilled from the fridge.
You will need (for two pies):
1 1/2 cups brown sugar (dark or light) 3 1/2 tsp cinnamon 1/2 tsp ginger (I'm not a ginger fan--feel free to double this amount) 4 eggs 2 cans Libby's pure pumpkin 1 12oz can evaporated milk 1 14oz can condensed milk 2 unbaked pie crusts
Preheat oven to 425.
I use the refrigerated pie crusts. They taste like homemade and don't require me to clean my food processor--a task I am none too fond of. Let them sit out for about 10 minutes or they will be too cold and will rip. But don't let them get to room temperature because then they will be too warm and will rip. I sprinkle a little bit of flour into the pie dishes before adding the crusts so that they don't stick. (Another little trick from my father-in-law.)
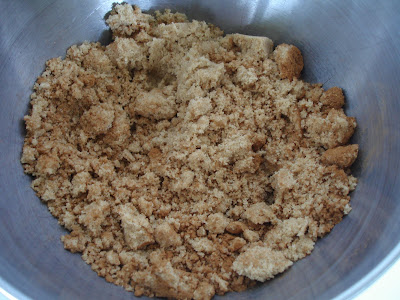
In a medium size bowl (not your mixer) add the brown sugar, cinnamon, and ginger. Give it a light mix.
In your large mixer bowl, add the eggs and beat for one minute.
(If you should happen to drop an egg on the floor, sprinkle it with salt and then it will wipe right up with a paper towel.)
Add your sugar and spice mixture to the eggs.
Mix thoroughly and then add your two cans of pumpkin.
Mix.
Pour in just the evaporated milk and mix together.
With the mixer on low add the condensed milk.
Make sure you scrape the sides and bottoms of the bowl.
Once everything is completely combined, pour into your pie crusts and bake at 425 for 20 minutes. Then reduce the heat to 350 and bake for another 50-60 minutes. When a toothpick inserted in the middle of the pies comes out clean, your pie is done. Cool completely and then cover with plastic wrap and refrigerate overnight.
I always like to "check" the pie in the morning by having a nice size slice. My father-in-law and I loooove pie for breakfast. :) Top with whipped cream, but please don't sully the pie with Chemical (Cool) Whip. Fresh cream! Reddi Whip will do in a pinch.
This pie makes those store bought pumpkin pies weep with shame. I think I better go have another piece just to make sure it still tastes awesome.
In my family there is only one cranberry sauce. I can't remember a Thanksgiving without it and would probably be tossed out on my ear if I ever tried to sneak in a different type. This recipe is crazy easy and way tastier than anything you will get from a can. I called my mom to get the story behind our sauce because I've never met anyone else who makes it this way. I thought it would be a great story--my mom frequently recreated dishes we would eat in Colonial Williamsburg. (I grew up right down the road from Williamsburg and we went there often.) Or better yet, it's a secret recipe passed down from my great-grandmother. Nope. Mom got the recipe off the back of the cranberry package when she married my dad and he refused the eat the canned junk. (He says it always tastes like the can.) Also, it's called cranberry relish, not sauce. Disappointing, but no matter! It's the only cranberry sauce served in this house. :) Maybe I'll make up a story for the kids.
You will need:
1 bag of fresh cranberries 1 large orange or 2 small 3/4 cup sugar (you may need a bit more) a blender
This year the monkeys want to help with Thanksgiving prep, so Tink made the sauce. She did a great job! This sauce gets better the longer it sits, so I always make it on the Monday before Thanksgiving. It will keep for a month and you can freeze the leftovers for 6 months or more.
Wash your oranges before cutting into them. Tink used one orange from our own tree and one Amber Sweet from our neighbor's tree. The juicer your orange the better. And the amount of sugar you use depends on how sweet the orange is. If you have a rather dry orange (California) add 2T of orange juice.
Remove all the meat and juice from your orange(s) and place into the blender. Be careful not to add any seeds. Tink had juice running down both arms by the time she was done.
Wash and sort the cranberries. Remove any stems or mushy berries. Then give them a pat with a paper towel to dry them a little.
Now dump the berries and the sugar into the blender on top of the orange.
Blend on high.
You may need to stop and push down some of the berries.
Then keep blending until almost smooth. You don't want any whole berries, but you don't want the sauce liquefied.
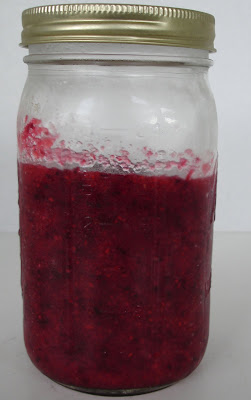
Store in a container or bowl in the fridge. I like to put my sauce in a quart canning jar. But don't check the sauce for sweetness yet. Let it ripen overnight and then check. It will sweeten as it sits and will also deepen in color.
Sweeten to your tastes after it ripens. We like our cranberry sauce a bit tart and this recipe is the perfect blend of sweet and tart.
We were down to the last of our apple cider and I wanted to try something other than a dessert or bread or donut to use it up. Something for dinner. I found this recipe by Sunny Anderson on Food Network. It had good reviews (unlike the mess of recipes that is Sandra Lee) and the idea of combining apples and onions intrigued me. We all loved the finished dish...so I guess I'll be buying more apple cider so that I can make it again. :) Big hit!
You will need:
2T oil 2T butter (Smart Balance) 4-6 boneless, skinless chicken breasts (I cut mine into thirds) salt and pepper 1 small onion, chopped however you prefer 1 Granny Smith apple, sliced 2 tsp garlic 2 bay leaves 2 tsp thyme (optional--I didn't use it) 2T flour 1 1/2 cups apple cider (I used just a cup because some monkey drank the rest)
Put the 2T of oil in a large skillet and add the chicken. Sprinkle with salt and pepper and cook on medium heat for four minutes on each side.
Then remove chicken to a plate and set aside.
Add the 2T of butter, the apple slices, and the onion to the pan.
Top it with the garlic and bay leaves. Stir.
Keep stirring until the apple and onion start to color, about 5 minutes on medium heat.
Sprinkle with 2T of flour and stir for 2 minutes.
Place chicken back into the pan and pour on the apple cider.
Bring to a boil, cover, and reduce heat to a simmer. Cook for 12 minutes.
Spoon some of the yummy sauce over the chicken before serving. The apples and onions are incredibly delicious together. Just the right about of sweet and savory. When I make it again I might add a couple of shakes of salt while the sauce and chicken cooks. YUM!!
The recipes on King Arthur Flour's website are amazing. Normally I would never try to recreate them on my little blog because the KAF bakers do an amazing job of step-by-step instruction. This particular recipe is one that one of the bakers, PJ Hamel, writes is a must for Thanksgiving. I was intrigued! I love to make bread and rolls and, although I have my favorites, I am always looking for new recipes. This one is a WINNER. Not only are these the best rolls that I have ever made, but they are the best I have ever had. Seriously. Better than those awesome rolls you get at a steakhouse, better than anything that has ever come out of a package, and better than any rolls I have had at a bakery. I can't say enough about how amazing they are!! I did have to change a few things, though, so I thought I would post my version. I changed things out of necessity, not because I thought of a better way, but the next time I make them (Thursday for Thanksgiving) I think I'll make them exactly as I'm about to show.
You will need:
3 1/2 cups KAF bread flour (I was out of all-purpose)
1 envelope yeast
1/4 cup potato flakes
2T sugar
1 tsp Kosher salt
4T softened butter
2/3 cup warm water
1/2 cup warm buttermilk
2 8-inch round baking pans
*********
2T melted butter
This recipe makes 16 dinner rolls. I thought about halving the recipe, but didn't. So glad I made all 16. They went quickly!
Here's why I changed what I changed: I went to the store to pick up potato flakes and dried milk. I don't use instant potatoes, but they sell them in single packs for 40 cents. A bargain and I didn't feel wasteful because I used most of the package, but the dry milk was another story. The cheapest I could find was more than $8 and that was for 10 single-serving packs. The original recipe only calls for 3T, so I didn't buy it. If you have it, use it! I ended up omitting it altogether, but figured I would use buttermilk instead of regular milk in an attempt to make up the difference. The result was AMAZING, so I think it worked.
Add all of the dry ingredients to a mixer bowl and combine lightly.
Then add the wet to the dry. (I poured my buttermilk into the water in a measuring cup and zapped both for 30 secs in the microwave to warm them. Worked great!)
Mix with a dough hook until you get a soft, smooth ball--around 5 minutes.
Lightly grease a bowl and place your dough in it. I dampened a towel with hot water and then squeezed out the excess water and placed it over my dough. Store in a warm location until it doubles in size. It will take about an hour.
Turn out the dough onto a greased surface. I sprayed my ugly (but squeaky clean) counter tops with cooking spray.
To get 16 (relatively) even pieces, cut the dough in half, then half again and so on.
Make the pieces into round balls and place 8 in each lightly greased round baking pan.
Allow to rise in a warm place. I did the warm towel thing again. It should take about an hour.
Bake in a 350 degree oven for 22-24 minutes. When they are done, brush them with the melted butter.
I didn't even give them a second to cool. You can flip them out onto a dish and then pull them apart. I just stuck a knife down in the pan and wedged one out. I couldn't wait. Your mouth will water just smelling them!
I asked the Goose if I should make them for Thanksgiving and she said, "you should make them every day." Tink even loved them and she is not a bread fan. This recipe will be our family's "must bake" for the holidays. Thank you King Arthur Flour!!
I am reading Jodi Picoult's Handle With Care. It's about a pastry chef who had to quit her job when her second daughter was born with osteogenesis imperfecta (brittle bone disease). She sues her OB/GYN (who just so happens to also be her best friend) for wrongful birth, claiming that had she been properly warned about the disease she would have terminated the pregnancy. Now, before you judge, she is only doing it so that she can afford to take proper care of her daughter, whose medical bills are off the charts. ANYWAY, there are recipes interspersed throughout the book, which is written as a series of letters to the young daughter with OI. One of the recipes is Blueberry Peach Buckle. Alton Brown says that a buckle is a type of cobbler, but is is more cake than biscuit. The book describes is as "cake made in one layer with berries in the batter." Is Alton ever wrong? :) I thought it would be fun to try out at least one of the recipes and boy am I glad I did! Incredible dessert. When I make it again (and I will) I will cut down on the butter in the topping. Other than that, perfect. And the book itself is really good, too!
You will need:
Topping-- 1/3 cup butter, cut into small pieces 1/2 cup brown sugar 1/4 cup all-purpose flour 1 tsp cinnamon (I used two) 1 tsp fresh ginger (I did not use ginger at all) ********************* Batter-- 1 1/2 cups flour 1/2 tsp baking powder pinch of salt 3/4 cup butter, room temperature 3/4 cup brown sugar 1 tsp vanilla 3 large eggs 2-3 cups wild blueberries (frozen fine) 2 ripe peaches (frozen fine)
I chose this recipe because I knew I had a half-bag each of peaches and blueberries in my chest freezer that I needed to use up or throw away. I don't know how much was left in each bag, but it looked to be a little more than a cup of peaches and 2 cups of berries.
Grease an 8-inch baking dish and preheat your oven to 350.
The recipe does not specify at what temperature the topping butter should be, but it should be cold. By the time I took a picture of my butter it was soft and I should have gotten another stick because you are supposed to mix the topping ingredients until you get a "coarse meal." I just got mush because it was 82 in my house today. I stuck it in the fridge while I made the cake. I would suggest using closer to 1/4 cup of butter instead of 1/3 because, well you'll see.
To make the batter, you'll need a mixer. Cream together the sugar and butter for 3 minutes.
Then add the vanilla and the eggs, one at a time, beating after each addition. Then the book/recipe gets fuzzy because it doesn't mention when to add the flour, but...now is good. I added it (with the baking powder and salt mixed in) in 1/2 cup increments, beating slightly after each 1/2 cup.
Then fold in the peaches and berries. Don't mix too much or you'll wind up with purple cake. Then again, purple cake is good!
Spread batter into your greased pan.
The book/recipe suggest baking for 45 minutes and it really does take that long. The center of mine was still a bit underdone when I took it out, but I didn't want the sides to dry out. I think it didn't bake in the middle because of the frozen berries. But the middle tasted heavenly! :)
See, that's why I suggest less butter in the topping. I used a spoon to get that excess butter off the top. No big deal, but I'll decrease the butter next time.
The cake part is delicious vanilla cake and the berries are out of this world good. Everything is sweet, but not too sweet. And I was worried about it being too sweet because of all the brown sugar. We ate it without whipped cream or ice cream and I recommend it plain. It does not need a darn thing added to it.
I created this food blog when my two girls were young, I was a stay-at-home mom, and I had not yet attended culinary school. Now I'm a classically trained chef with two college-age daughters. This blog will always be so special to me and I hope you enjoy my old recipes.