Showing posts with label green beans. Show all posts

14 October 2009

Roasted Green Beans

When I was growing up my Southern grandmother did a lot of the cooking in our house. She lived with us and made biscuits so perfect they could bring tears to your eyes. She used to sit on the front porch every day, smoking, and sometimes, snapping beans for supper. Using a spoon she would snap off the ends of green beans, sometimes 6 or more at a time, snap the bean in half and toss it in her bean bowl. My brother and I and a bunch of the neighborhood kids would be playing baseball in our front yard (making a mess of the lawn my dad took such meticulous care of--he never could keep grass at the "bases") and she would watch us while snapping her beans. So, I thought about her this afternoon while I was snapping beans for dinner and watching "my program," as she would call our afternoon soap opera. I miss her terribly, but it's nice to know that little moments can bring me right back to my childhood--listening to the crack of the baseball on the bat while she snapped beans on the front porch.

You will need:

1 pound fresh green beans, rinsed
olive (or canola) oil
kosher salt (or sea salt)
pepper (optional)
foil-lined cookie sheet with sides


Aren't those beautiful green beans? They deserve another look...


Preheat your oven to 425.

I use a two-bowl system. One bowl for the cast-off ends and one bowl for the beans. Use a spoon to snap off the ends.


If you have long beans, snap them in half so they are all about the same size and will cook evenly.


My grandmother always boiled her green beans with bacon, Southern style. But I think she would love them prepared this way, too. Put the beans on the cookie sheet and drizzle them with oil. Use your hands to toss them around until they are completely coated.


Sprinkle with salt and pepper, if you like. I use Kosher salt, but if you are concerned about your sodium intake switch to sea salt. They will be perfectly seasoned with a lot less sodium.


Bake at 425 for 10 minutes. Then remove from oven and toss.


Bake for another 8 minutes and they are done. Easy as that. They will be slightly browned. If you want to fancy them up, toss in some toasted almonds or even some bacon bits. But I like them plain.


They are so good! I eat them like candy and we never, never have leftovers.


Emjoy!

21 August 2009

Healthier "Fried" Chicken Fingers

If you have kids you know they all adore chicken tenders/fingers/nuggets, but it's hard to let them indulge when you know how bad the fried part of the dish is for them. I have a solution! It's simple, cheap, and incredibly tasty. In fact, my whole family thinks this recipe is tastier than fried chicken fingers because it is not at all greasy or heavy tasting from the oil. These chicken fingers are also great for parties and picnics. And they are absolutely fabulous the next day, cold from the fridge.

You will need:

3 boneless, skinless chicken breasts (cut into thirds or fourths)
1 cup whole wheat flour (King Arthur!)
1 egg
1 T water
4T Smart Balance
seasoning salt
garlic powder/salt
************
1 cookie sheet with sides (jelly roll pan)
2 bowls or dishes (one for the egg, one for the flour)


Line your cookie sheet with foil and drop 2 T of the Smart Balance (or butter) on top. Place in your oven while it preheats to 400 degrees. The butter will be melted and ready to come out of the oven before it is completely preheated.


In one bowl, mix the egg, water, and seasonings. I like to add the seasoning to the egg mixture because it adheres to the chicken better. The flavor can get lost when you add it to the flour. Add seasoning salt and garlic salt to taste. I just shook them a couple of times each.


Mix together.


Add your flour to the second bowl. Pie plates work great for the egg and flour mixes, too.


Brush the Smart Balance all over the cookie sheet.


Set up a little station-- chicken, then egg, then flour, then cookie sheet. Dip each chicken tender into the egg mixture and make sure it is coated completely.


After the chicken is coated with egg, dredge it in the flour and coat evenly.


Then place it onto your buttered cookie sheet. Repeat until all chicken is coated and on the cookie sheet.


Don't be alarmed if your fingers look like this when you are finished:


Don't worry, it washed right off! :)

Melt the remaining Smart Balance (2T) and drizzle it over the chicken. Then put the sheet in the oven and bake at 400 for 20 minutes.


The chicken comes out crispy and tender.


The tenders don't stick to the foil at all. Comes off clean, coasting intact.
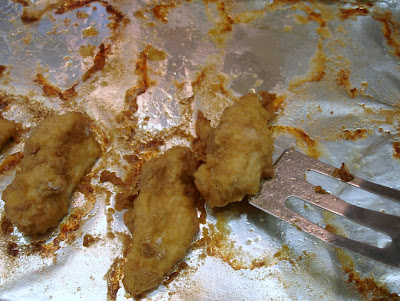


So yummy!! Kids will lap them up and parents can feel good about these tenders having no oil, no skin, and no white flour. The whole wheat adds a subtle, nutty flavor, but otherwise I promise you and your kids will not notice a difference.


I served them to the monkeys with green beans and half a baked potato topped with just a touch of shredded cheddar and low fat sour cream. They cleaned their plates!


Enjoy!!

17 June 2009

Macaroni Stew

This recipe is so simple and so flavorful. Tomato allergy or not, it is one of my all-time favorites and I always brave the stomachache and eat some. You can make this stew on the stove or in the slow cooker. And like chili, it's even better the next day!

You will need:

1 pound lean ground beef or turkey
1 medium onion
1 cup chopped carrots
2 cans green beans
1 cup (or 1 can) corn
1 small can tomato sauce
1 small can tomato paste (I like the kind with roasted garlic)
1 envelope Lipton onion soup
2 cups water
salt and pepper to taste
********************
8 oz cooked elbow macaroni


Saute the meat with the onion and carrots until all traces of pink are gone from the meat. If you meat is super lean, you might need to add 1T of oil. (My carrots look strange because all I had were those matchsticks carrots for salads. Someone--and I won't name names--ate all my baby carrots.)


Stir in the rest of the ingredients, except the macaroni. Do not drain the canned veggies.


Bring to a boil and then lower the heat. Cover and simmer for at least an hour, but the longer the better.


If you plan on eating the entire pot in one night, then you can add the macaroni to the pot. If not, then add a handful of macaroni to each bowl before topping with stew. Pasta has an annoying habit of swelling and then breaking down in the stew pot. The stew will be nice and hot and will warm the macaroni immediately.


Stir and enjoy! (Ignore the magically changing bowl...I forgot to take a picture in the white bowl before hubby started chowing down.)