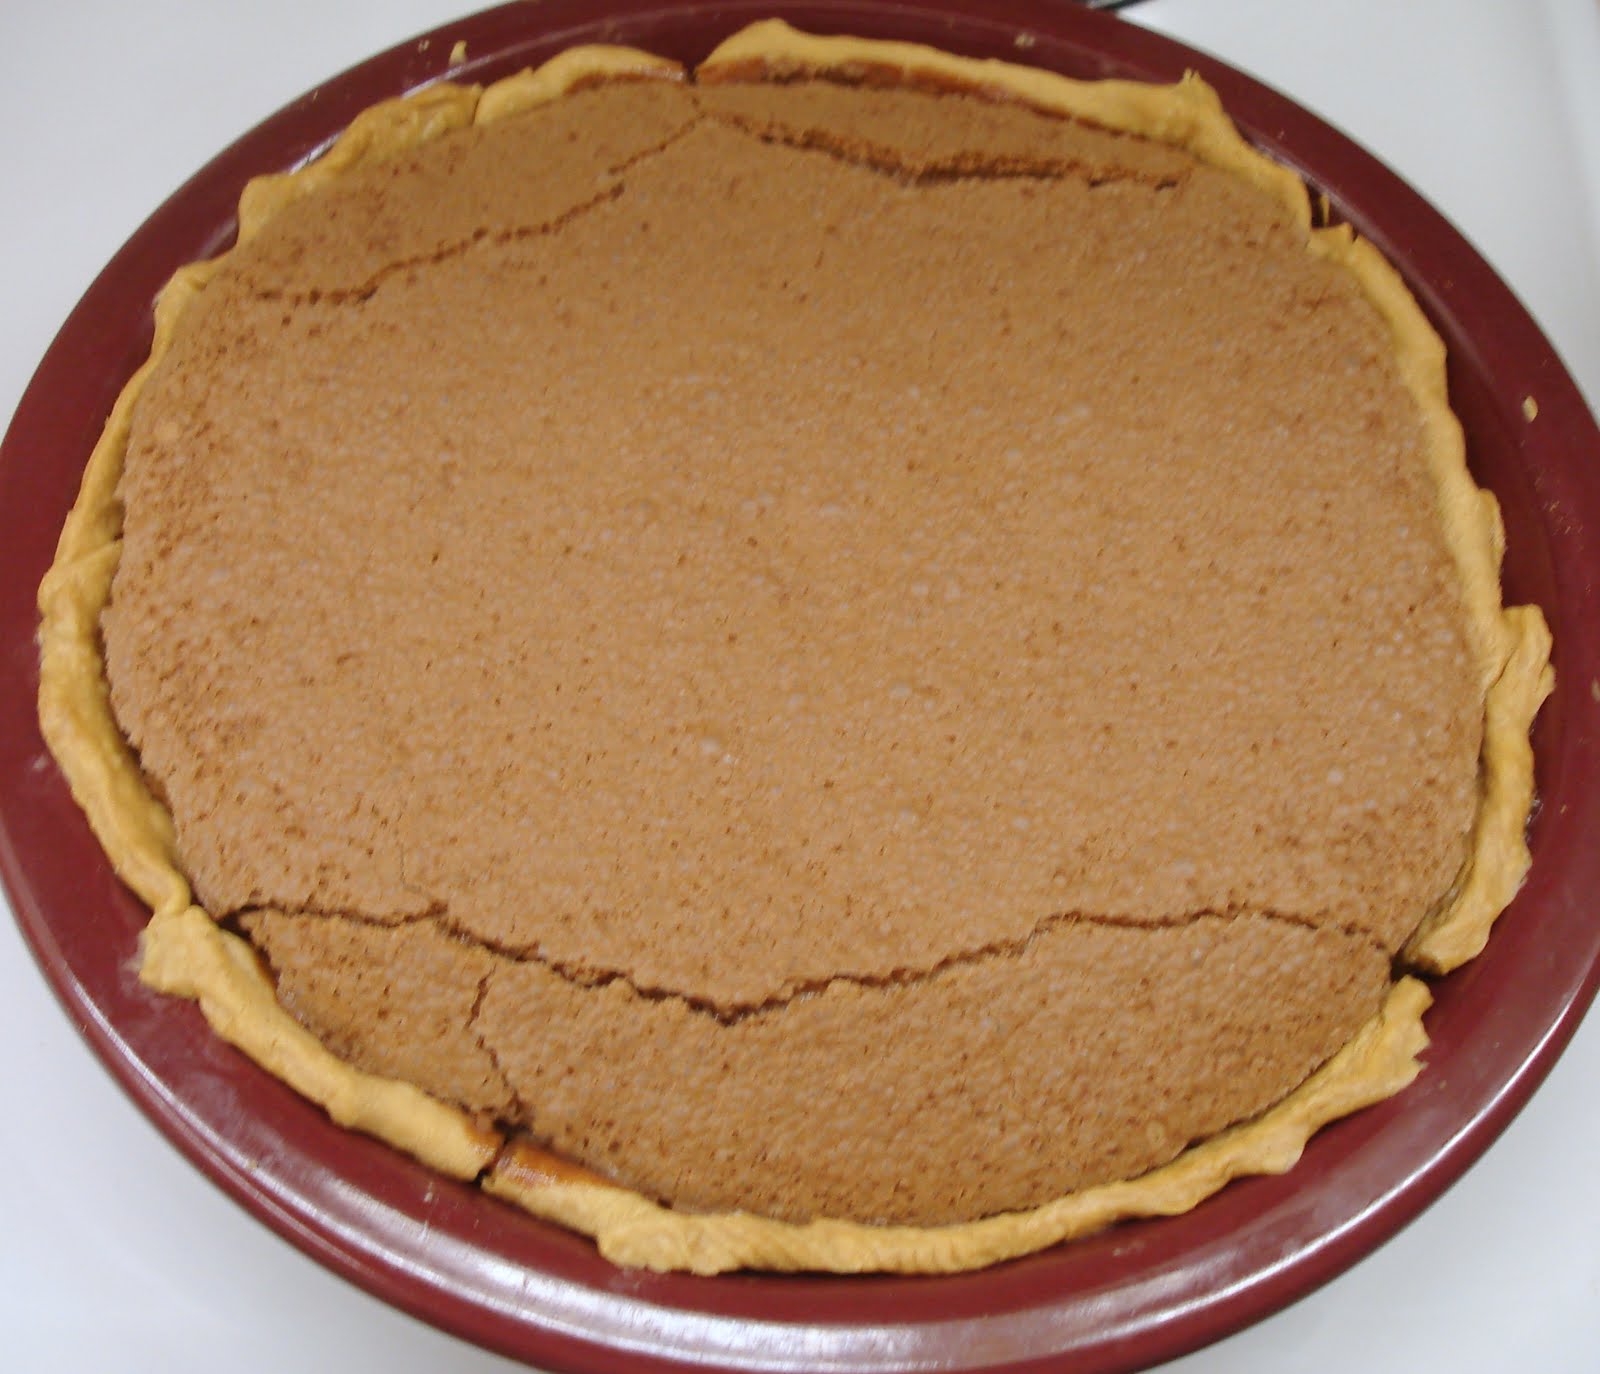
This recipe for chocolate chess pie is one of the first pies I learned to make. I used to make it every time we had spaghetti when Bubba and I were first married and living in Germany. I made it many, many times and then...I stopped making it for years. I forgot about it. A couple of weeks ago, I was going through my old recipe books that are, sadly, used more for decoration on my counter rather than a source for recipe ideas. Now, I just go to the internet and look up a recipe or stumble through food sites gathering ideas. So, my poor collection of Southern cookbooks sit gathering dust. (Or trying, at least. I dust them often because they are in the kitchen.) I was so excited to refind this recipe! I have little notes written down in the cookbook, "does NOT make deep dish," and "DOUBLE." I doubled the recipe, per instruction, and made a deep dish chocolate chess pie.
You will need:
2 squares unsweetened chocolate
1 cup butter
4 eggs, beaten
2 cups sugar
2 tsp vanilla
1 deep dish unbaked pie crust*
*I only use homemade pie crusts now. I used to buy those refrigerated ones, but then starting making my own (as I always did years ago before the refrigerated ones were available) and wow. Just wow. The difference!! I use this recipe. It is absolute perfection. It also gives me an excuse to get the vodka out of the freezer.)
Preheat your oven to 325°
In a small saucepan over low heat, melt the butter and chocolate. (Make sure the butter is warmed first or is room temperature when you add it or the chocolate will seize.)
While it cools, beat the eggs.
Then add the sugar.
Slowly pour in the cooled chocolate and butter mix and then add vanilla.
Pour it all into your unbaked pie crust and bake for 30-35 minutes or until the center is set. You don't need to place this pie on a cookie sheet because it will not spill over. (Also, placing it directly onto the oven rack will allow the bottom crust to cook thoroughly.)
It makes a nice, crackly crust on top and leaves the middle gooey and rich. And soooooooo delicious.
You could add fresh whipped cream (not Chemical Whip) or ice cream, but why paint the peacock? This pie is fabulous all by its lonesome.
Enjoy!!
Showing posts with label pie crust. Show all posts
22 September 2010
01 July 2010
Old Glory Pie
In honor of Independence Day, I finally turned on my oven! I thought I would do something a little different this 4th of July. Normally I bake the best apple pie ever (it truly, truly is) or my flag cake. This year, I combined the two...sort of...and made a flag pie with blueberries and red cherries.
My favorite thing about this time of year isn't the summer heat (seriously, it's not the heat), the fireworks, the long weekend, the homemade ice cream, or the fresh corn, but the beautiful, endless bounty of fresh berries. (And before you even think it, I know that cherries are not a berry. In fact, Bubba, Tink, and I just had a long discussion about how much a cherry is not a berry. One of us even resorted to googling "is a cherry a berry," but I won't say who.) So, stock up on all the berries in your local farmer's market or grocery store and toss any berries that don't get eaten into a freezer bag and they will keep until next year. These blueberries came from a farm less than an hour from our house!
You will need:
5 cups dark cherries (fresh or frozen)
1 1/2 cups blueberries (fresh or frozen)
3 T lemon juice
1 cup sugar
1/4 cup cornstarch
1 heaping T instant tapioca pearls (1T plus 1/4 cup if using frozen cherries)
1T butter, cut into pieces
two pie crusts
Preheat your oven to 375 degrees.
Wash and pit your cherries (or open up three bags of frozen) and put them in a large bowl. Wash and check your blueberries for stems and place them in a smaller bowl. Toss the cherries with 2T of the lemon juice, the blueberries with the remaining 1T of juice. Mix together the sugar and the cornstarch. Add 1 cup of the mixture to the cherries and stir gently.
Then add the remaining 1/4 cup of mixture to the blueberries.
If you are using fresh berries, get a heaping T of tapioca and sprinkle the pearls onto the blueberries until you are left with a real tablespoon. Sprinkle the remainder onto the cherries. Stir. If you are using frozen berries, add 1T of tapioca pearls to the blueberries and 1/4 cup pearls to the cherries. Either way, let the mixtures sit for 15 minutes.
While the berries and cherries are hanging out (or as the kids would say, chillin' out, maxin', relaxin', all cool) place one pie crust into your pie pan and set the other out on a floured countertop or pastry cloth. Cut off the bottom of one side so that you have a nice, long, evenly flat side. Then, using a pizza cutter, cut three long, even pieces for the 3 long stripes. (You will eventually end up with 3 long stripes, 3 short stripes, and 6 stars.)
Set those aside and cut one more. Now cut that one into thirds.
If you have a mini star cookie cutter, good for you! If you had one but lost it (like me) or have never had one you can freehand the stars or use a template. I used a cupcake decoration. You need 6 stars.
Now you have your stars and stripes!
Bend a bit of aluminum foil to create a dam for the blueberries in the upper left-hand quadrant of your pie dish.
Pour your blueberries into your dam, then pour the cherries into the remaining 3/4 of the pie. Slowly remove the foil.
Place the butter pieces around the pie.
Now add your stars and stripes! Stars over the blueberries, of course. :)
Tuck the edges of the stripes into the bottom pie crust.
Bake at 375 for 40-60 minutes. The sauce will thicken up quite a bit while it bakes.
Don't run to the dry cleaners and the library while the pie is in the oven because it may only need 40 minutes and 60 minutes will make the top crust kind of brown. But even if you do run errands, the pie is going to taste AWESOME.
My favorite thing about this pie is that the berries (and cherries) really shine. Their natural sweetness is enhanced by the mere 1 cup of sugar and not overwhelmed. Have you ever had one of those cherry pies that taste like pure, gooey sugar? Ick. This pie is all about the berries. And cherries, which are not a berry dang it! :)
You can taste the perfectly ripe blueberries and the tang of the fresh cherries. This pie is a showcase for berries! And cherries!!
I hope you enjoy it every bit as much as we did. I doubt there will be any left for us for the actual 4th of July. Guess I'll have to make another one!!
Happy 4th of July!!!!!!!!!!!!
My favorite thing about this time of year isn't the summer heat (seriously, it's not the heat), the fireworks, the long weekend, the homemade ice cream, or the fresh corn, but the beautiful, endless bounty of fresh berries. (And before you even think it, I know that cherries are not a berry. In fact, Bubba, Tink, and I just had a long discussion about how much a cherry is not a berry. One of us even resorted to googling "is a cherry a berry," but I won't say who.) So, stock up on all the berries in your local farmer's market or grocery store and toss any berries that don't get eaten into a freezer bag and they will keep until next year. These blueberries came from a farm less than an hour from our house!
You will need:
5 cups dark cherries (fresh or frozen)
1 1/2 cups blueberries (fresh or frozen)
3 T lemon juice
1 cup sugar
1/4 cup cornstarch
1 heaping T instant tapioca pearls (1T plus 1/4 cup if using frozen cherries)
1T butter, cut into pieces
two pie crusts
Preheat your oven to 375 degrees.
Wash and pit your cherries (or open up three bags of frozen) and put them in a large bowl. Wash and check your blueberries for stems and place them in a smaller bowl. Toss the cherries with 2T of the lemon juice, the blueberries with the remaining 1T of juice. Mix together the sugar and the cornstarch. Add 1 cup of the mixture to the cherries and stir gently.
Then add the remaining 1/4 cup of mixture to the blueberries.
If you are using fresh berries, get a heaping T of tapioca and sprinkle the pearls onto the blueberries until you are left with a real tablespoon. Sprinkle the remainder onto the cherries. Stir. If you are using frozen berries, add 1T of tapioca pearls to the blueberries and 1/4 cup pearls to the cherries. Either way, let the mixtures sit for 15 minutes.
While the berries and cherries are hanging out (or as the kids would say, chillin' out, maxin', relaxin', all cool) place one pie crust into your pie pan and set the other out on a floured countertop or pastry cloth. Cut off the bottom of one side so that you have a nice, long, evenly flat side. Then, using a pizza cutter, cut three long, even pieces for the 3 long stripes. (You will eventually end up with 3 long stripes, 3 short stripes, and 6 stars.)
Set those aside and cut one more. Now cut that one into thirds.
If you have a mini star cookie cutter, good for you! If you had one but lost it (like me) or have never had one you can freehand the stars or use a template. I used a cupcake decoration. You need 6 stars.
Now you have your stars and stripes!
Bend a bit of aluminum foil to create a dam for the blueberries in the upper left-hand quadrant of your pie dish.
Pour your blueberries into your dam, then pour the cherries into the remaining 3/4 of the pie. Slowly remove the foil.
Place the butter pieces around the pie.
Now add your stars and stripes! Stars over the blueberries, of course. :)
Tuck the edges of the stripes into the bottom pie crust.
Bake at 375 for 40-60 minutes. The sauce will thicken up quite a bit while it bakes.
Don't run to the dry cleaners and the library while the pie is in the oven because it may only need 40 minutes and 60 minutes will make the top crust kind of brown. But even if you do run errands, the pie is going to taste AWESOME.
My favorite thing about this pie is that the berries (and cherries) really shine. Their natural sweetness is enhanced by the mere 1 cup of sugar and not overwhelmed. Have you ever had one of those cherry pies that taste like pure, gooey sugar? Ick. This pie is all about the berries. And cherries, which are not a berry dang it! :)
You can taste the perfectly ripe blueberries and the tang of the fresh cherries. This pie is a showcase for berries! And cherries!!
I hope you enjoy it every bit as much as we did. I doubt there will be any left for us for the actual 4th of July. Guess I'll have to make another one!!
Happy 4th of July!!!!!!!!!!!!
Labels:
4th of July,
berries,
blueberries,
cherries,
pie,
pie crust
10 September 2009
Chicken Pot Pie
One of the girls' favorite books when they were little was Moostache. I loved reading it to them, too. Really, really fun. The main character is a moose with an unruly mustache that he tries to tame. Every plan seems "so simple. So easy. So perfectly perfect." It's become a family mantra. This recipe epitomizes Moose's refrain. It is easy, it is super simple, and the end result is perfect. :)
You will need:
2 boneless, skinless chicken breasts, baked
2 cans of No Salt Added veg-all
2 cans cream of potato soup
milk
2 pie crusts
9-inch deep dish pie pan
Cavender's (optional)


I buy those bags of frozen chicken. It's much cheaper, which is a plus for our strict budget family that goes through so much chicken each week. So I took out two breasts, sprinkled them with Cavender's and baked for 25 minutes on 400.

When the chicken is cool, tear it up into bite size pieces. You can chop it up or cube it if you like that better, but I always tear up my chicken.

Add the two cans of potato soup...

then your veg-all. I don't use canned veggies very often, except for green beans. (Frozen green beans are a nightmare. Why are they sooo bad?) Veg-all is perfect for this easy dish, but feel free to use fresh carrots, celery, potatoes, peas, and a bit of corn. Just saute them until they soften slightly, but still have bite.

Sprinkle with Cavender's. I found a copycat recipe online if you would like to make your own. If you don't have it and don't want to make it, don't worry! Just use salt and pepper to your taste, and give a couple of shakes of onion powder, garlic powder, and parsley.

Mix together and add some milk. Start with a half cup and go from there. You want it to be very creamy, but not wet.

Put a little flour in the bottom of your pie plate so the crust won't stick. I like to use the refrigerated pie crusts, but to make this recipe even easier you could absolutely use those deep dish frozen pie crusts. They come in a package of two and you could use the second one to top the first. Less dishes that way, too. But that's the only time I will ever recommend frozen pie crusts. :)

Place one of your crusts into the pie dish.

Pour your filling into the pie pan...

and top with second crust. I don't bother with making an edge crust for my chicken pot pie. I just tuck the top crust over the bottom and down the side of the pie pan.

Cut a few holes into the top crust to let out the steam. Feel free to get creative. I just sliced a few lines, but I have been known to spell out someone's name.

Bake at 400 for 40 minutes or until filling is bubbly hot and crust is golden brown.

Let it sit for ten minutes and then feast!

My girls devour this dish. Even Tink, who refuses to eat most chicken dishes because we have pet chickens. This pie is perfect the next day, too. I just warm up a piece in the microwave for one minute on high.


Enjoy!
You will need:
2 boneless, skinless chicken breasts, baked
2 cans of No Salt Added veg-all
2 cans cream of potato soup
milk
2 pie crusts
9-inch deep dish pie pan
Cavender's (optional)
I buy those bags of frozen chicken. It's much cheaper, which is a plus for our strict budget family that goes through so much chicken each week. So I took out two breasts, sprinkled them with Cavender's and baked for 25 minutes on 400.
When the chicken is cool, tear it up into bite size pieces. You can chop it up or cube it if you like that better, but I always tear up my chicken.
Add the two cans of potato soup...
then your veg-all. I don't use canned veggies very often, except for green beans. (Frozen green beans are a nightmare. Why are they sooo bad?) Veg-all is perfect for this easy dish, but feel free to use fresh carrots, celery, potatoes, peas, and a bit of corn. Just saute them until they soften slightly, but still have bite.
Sprinkle with Cavender's. I found a copycat recipe online if you would like to make your own. If you don't have it and don't want to make it, don't worry! Just use salt and pepper to your taste, and give a couple of shakes of onion powder, garlic powder, and parsley.
Mix together and add some milk. Start with a half cup and go from there. You want it to be very creamy, but not wet.
Put a little flour in the bottom of your pie plate so the crust won't stick. I like to use the refrigerated pie crusts, but to make this recipe even easier you could absolutely use those deep dish frozen pie crusts. They come in a package of two and you could use the second one to top the first. Less dishes that way, too. But that's the only time I will ever recommend frozen pie crusts. :)
Place one of your crusts into the pie dish.
Pour your filling into the pie pan...
and top with second crust. I don't bother with making an edge crust for my chicken pot pie. I just tuck the top crust over the bottom and down the side of the pie pan.
Cut a few holes into the top crust to let out the steam. Feel free to get creative. I just sliced a few lines, but I have been known to spell out someone's name.
Bake at 400 for 40 minutes or until filling is bubbly hot and crust is golden brown.
Let it sit for ten minutes and then feast!
My girls devour this dish. Even Tink, who refuses to eat most chicken dishes because we have pet chickens. This pie is perfect the next day, too. I just warm up a piece in the microwave for one minute on high.
Enjoy!
Labels:
Cavender's,
chicken,
chicken pot pie,
pie crust
19 July 2009
The Best Apple Pie Ever!
Apple pie is my least favorite pie. Un-American, I know. I love apples, love brown sugar, love cinnamon, love pie, don't like them mixed together. I don't even like the smell of apples and cinnamon. Weird, I know. But, this recipe I like. Not love, but like and based on my tolerance and my family's adoration for this pie I figure it must be the best darn apple pie ever.
You will need:
1/2 to 1 cup flour
6-7 cups Granny Smith apples
1 cup sugar
1 cup brown sugar
2 T butter
1 tsp cinnamon (I use more...lots more.)
2 pie crusts
1 pie pan
cinnamon sugar

One apple equals about one cup, so I used 6 apples. If you get your hands on some tiny Granny Smiths you might need closer to 8. I used my handy dandy apple peeler (it also cores and slices). I love it and wish I loved to bake with apples more so I could use it more often.

The peels were so pretty I just had to take a picture.

Mix the flour, sugars, and cinnamon in a large bowl. I used 3/4 of a cup of flour. Finding the right amount of flour is tricky...it all depends on the juiciness of your apples. Unfortunately, you usually can't tell how much liquid they will give up until they are baked. It's a crap shoot--you could end up with an overly-juicy pie or one that is too thick and can stand on its own. Those pie slices that are thick and stand up high are beautiful in magazines, but they don't taste so great in real life. I have found that 1/2 cup is almost always too little, though.

I like to chop my apples instead of slicing them. With the slices you have to cut up your pie and I don't like that. I just want to dig in and get a forkful. The large chops cook all the way through, I promise.

Now add your apples to your flour, sugar, cinnamon mix and get in there with your hands to mix. Kids love to help out with this part!

Line your pie plate with one crust. I just use the refrigerated ones. Easy and super yummy. Add all of the covered apples to the pie pan. You will have lots of the mix leftover--just pour it over the apples.

Cut up the 2T of butter and place around the top of the pie.

Now here's a trick. I use mini cookie cutters to cut out shapes from the top crust. This trick allows more steam to evaporate from the pie and caramelizes the sugars inside. SO GOOD! (Save your cutout shapes.)

Place the top crust on top of your pie and seal the edges. Now brush the entire top crust with milk and place your cutout shapes anywhere you like, except over the openings. Now brush the tops of the cutouts with milk and sprinkle cinnamon sugar over the top of the whole pie.

Bake at 375 degrees for 45-55 minutes. I use a cake tester to poke the apples and make sure they are soft. I've never had to bake for more than 55 minutes.


This pie speaks for itself, don't you think?


Enjoy!
**note: I baked this pie a few months ago. I'm still not turning on my oven in this heat and I am really, really looking forward to the big cool down in September (if we are lucky) or October. Definitely cooler by November. Or December. I'm having trouble remembering when it was cool... :)
You will need:
1/2 to 1 cup flour
6-7 cups Granny Smith apples
1 cup sugar
1 cup brown sugar
2 T butter
1 tsp cinnamon (I use more...lots more.)
2 pie crusts
1 pie pan
cinnamon sugar
One apple equals about one cup, so I used 6 apples. If you get your hands on some tiny Granny Smiths you might need closer to 8. I used my handy dandy apple peeler (it also cores and slices). I love it and wish I loved to bake with apples more so I could use it more often.
The peels were so pretty I just had to take a picture.
Mix the flour, sugars, and cinnamon in a large bowl. I used 3/4 of a cup of flour. Finding the right amount of flour is tricky...it all depends on the juiciness of your apples. Unfortunately, you usually can't tell how much liquid they will give up until they are baked. It's a crap shoot--you could end up with an overly-juicy pie or one that is too thick and can stand on its own. Those pie slices that are thick and stand up high are beautiful in magazines, but they don't taste so great in real life. I have found that 1/2 cup is almost always too little, though.
I like to chop my apples instead of slicing them. With the slices you have to cut up your pie and I don't like that. I just want to dig in and get a forkful. The large chops cook all the way through, I promise.
Now add your apples to your flour, sugar, cinnamon mix and get in there with your hands to mix. Kids love to help out with this part!
Line your pie plate with one crust. I just use the refrigerated ones. Easy and super yummy. Add all of the covered apples to the pie pan. You will have lots of the mix leftover--just pour it over the apples.
Cut up the 2T of butter and place around the top of the pie.
Now here's a trick. I use mini cookie cutters to cut out shapes from the top crust. This trick allows more steam to evaporate from the pie and caramelizes the sugars inside. SO GOOD! (Save your cutout shapes.)
Place the top crust on top of your pie and seal the edges. Now brush the entire top crust with milk and place your cutout shapes anywhere you like, except over the openings. Now brush the tops of the cutouts with milk and sprinkle cinnamon sugar over the top of the whole pie.
Bake at 375 degrees for 45-55 minutes. I use a cake tester to poke the apples and make sure they are soft. I've never had to bake for more than 55 minutes.
This pie speaks for itself, don't you think?
Enjoy!
**note: I baked this pie a few months ago. I'm still not turning on my oven in this heat and I am really, really looking forward to the big cool down in September (if we are lucky) or October. Definitely cooler by November. Or December. I'm having trouble remembering when it was cool... :)
Labels:
apple pie,
apples,
baking,
brown sugar,
caramelize,
cinnamon,
pie crust,
pie plate,
pie tin,
recipe,
sugar,
tyler florence
Subscribe to:
Posts (Atom)