17 July 2009

Margarita Chicken

What says summer better than a margarita? Well, margarita does a great winter, spring, and fall, too. It's an equal opportunity drink. This recipe is great for chicken or fish. I love to cook Mahi Mahi this way, although I switch out the Montreal Chicken seasoning for Steak seasoning when I do fish.

You will need:

1 can frozen margarita mix, thawed
2/3 cup tequila
2 T Montreal Chicken seasoning
6 boneless, skinless chicken breasts


Clean the chicken and cut each breast into thirds and put into a plastic bag. In a bowl mix together the margarita mix, tequila, and seasoning. I like to use Jose Cuervo Gold in recipes and drinks because it has a strong, bold flavor. I used Jose's White in margaritas once and they had no tequila flavor at all. Very sad.


Pour the marinade into the bag over the chicken and marinate for at least an hour, four is better, but don't do it overnight.


The chicken is best cooked in a frying pan. I add about a tablespoon or so of oil in the pan, but if you have non-stick it is really not necessary. Cook for 7 minutes over medium heat on first side, then flip and cook for another 3-5 minutes (depending on how thickness of your chicken).


Are you loving my new green frying pan? I am!!

The sugars in the margarita mix will start to brown, so it's important that your heat is not too high. It makes for a really yummy coating on the chicken. Really, really tasty.


It is possible that this chicken is excellent eaten cold right out of the fridge, but I have no idea. We never have any leftovers from margarita chicken.

Enjoy!

**note: I never use the frozen mix for margaritas. I am a strict Finest Call gal. Some Finest Call margarita mix, a heavy pour of Jose Gold, a few splashes of Triple Sec, and ice. I suddenly got very thirsty...

16 July 2009

Workout Shake

I hate working out. Really, really hate it, but I love it when I am finished. My preferred workout time is the morning, before breakfast. I can't eat and then work out. Big yuck, but I always need something (cold) when I'm done torturing myself. This shake cools me down, fills me up, and gives me energy to get through the rest of the day. It's my reward for sweating and crying my way through another workout.

You will need:

1/4 cup frozen blueberries (or fresh)
1 scoop soy protein powder
a banana
8 oz water
4 (or more) cubes of ice
blender
1/2 T flaxseed oil (optional)


You can find soy protein powder at any store--I get mine at Wally Mart. It's not at all expensive and lasts a long time, but you do get less than what the canister implies.


That's a new can. Really! It's like opening a bag of chips and more than half the bag is air. I suppose the protein powder "settled?" Hmm. Still, it's cheap and will last you for months.

Add all of your ingredients to the blender in no particular order. (I find that this shake is plenty sweet, but if you want it even sweeter you can add a teaspoon or so of honey.)


Blend.


This shake supposedly makes two servings, but I've found that it really makes about one and a half. I suppose if you weren't replacing your breakfast with the shake it would be two servings. I can usually find a monkey who want to the finish the shake for me or I put the remainder in the fridge and have it for a snack later on in the afternoon. It makes a great 3 o'clock pick-me-up!


The shake comes out a beautiful purple color. My pictures don't do it justice...it's hard to photograph glass.


Enjoy!

12 July 2009

Chili

It took years and years of trying different chili recipes and adapting them to our tastes until I found the perfect combination for our family. So, while this recipe is perfect in our eyes (and tastes) maybe it will just be the stepping stone for your new recipe. If chili is done right it will have depth to its flavor--it will taste one way when you take a bite, another when you start to chew, and another level of flavor after you swallow. I'll show you some tricks you can use in your own recipe to get those layers of flavor.

For my family's perfect chili you will need:

4-5 cans Bush's Best Chili Beans, mild (beans are my fav part of chili)
1 can chopped tomatoes with green chilies
Mexene chili powder
1 large onion
1 large green pepper
Tabasco sauce (to taste)
1 cup ketchup
1 pound ground beef
1 bottle beer (I like Bud--not too strong, not too mild)


Brown your ground beef with the onion and 2T chili powder. I add a tablespoon or two of oil, olive is fine. High quality chili powder makes all the difference in the world. After years of trying the different brands of powders I think Mexene is my favorite. You couldn't pay me to put McCormick chili powder in chili.


This is your first layer of flavor and believe me, it makes a difference!

When the meat is mostly brown add your green pepper and a couple of shakes of Tabasco. Cook over medium heat for about 15 minutes. Second layer of flavor.


While it is cooking, open up all your cans. I love my One-Touch!


After the meat and pepper is cooked through, add the rest of your ingredients (except the beer) and 1/4 cup of chili powder.


Stir it up and let it cook for about 30 minutes or so. Then add your beer. I use Bud because, well, it's the King of Beers, but also because it has the yeasty flavor without the darkness of a stout.


You only need about half to 3/4 of the bottle. Up to you what you do with the rest of the ice cold beer. :)


Chili is better the longer you cook it, so bring this recipe to a boil and then simmer for at least 4 hours, 6 is better. If you are in no hurry, cook it for a few hours, remove from heat and let it cool a bit, then stash it in the fridge until the next day. Chili is ALWAYS better the next day. This recipe is also fabulous in the crock pot. Brown the meat, onion, and chili powder and add the mix with the rest of the ingredients in your slow cooker. Cook on low overnight and then set to the warm setting in the morning. It's ready when you are!


When you take a bite of this chili you taste the warmth, the tomato, the chili powder, then you chew and taste the beer, the yummy beans, and the beef. The aftertaste is a tangy tomato flavor with a kick of the Tabasco.


Enjoy!

This recipe was featured on blog.recipelion.com!

10 July 2009

Strawberry Shortcake

March is strawberry season here in Florida, more specifically in Plant City "Winter Strawberry Capital of the World". Winter it is not, we wear shorts and flip flops to the Plant City Strawberry Festival every year. This year I decided to try my hand at making jam, so I bought A TON of strawberries. I made two batches (16 pints) of low sugar jam and still had enough leftover for a freezer full of strawberries already cut up and sweetened for shortcake. We also had strawberry pie, strawberry cupcakes, strawberries on our french toast and I think Tinker Bell ate more than she cleaned. We love March! So this recipe is for the shortcake biscuits and it makes enough for 8 people or 4 people with leftovers. The biscuits are fantastic in the morning with a little strawberry jam!


You will need:

3 cups all-purpose flour
3 T white sugar
1 1/2 T baking powder
3/4 tsp salt
1 1/2 cups butter
1 1/2 cups half and half
1 1/2 tsp vanilla

strawberries, sliced with sugar to taste (allow to sit for at least a half hour)
more whipping cream and sugar for topping


Sift the flour, sugar, baking powder, and salt in a large bowl and cut in the butter. I use a pastry cutter, but knives or even a couple of quick pulses in the food processor works great. (I just hate cleaning my food processor and actually enjoy working the butter into the flour with my pastry cutter--memories of my grandmother working shortening into flour for biscuits.) Work it until you have pea-sized crumbs.


Combine the cream and vanilla.


Make a well in the flour mixture and add your cream. Mix gently until just combined.


This dough isn't pretty and it may even feel a bit dry. Totally okay! Gently knead it by hand a few times, creating a loose ball. Turn the dough onto a lightly floured, parchment lined cookie sheet and pat into an 8-inch square about 3/4 of an inch thick. Any thicker than that and you may end up with raw middles in your biscuits.


Cover with plastic wrap and chill in the fridge for 20 minutes. This step is important--why? You want the butter to be cold because that is what gives you the flaky texture you love in biscuits. Trust me on this one.

Preheat your oven to 425. Take out the dough, slide the parchment onto the counter, and cut it into 9 even squares. Place them about 2 inches apart on a greased cookie sheet.


Bake until medium brown, 15 minutes exactly if your oven is spot-on with its temperatures.


My biscuits look a little ratty, I know. And I don't care, but if you like perfect biscuits that you can cut in half then just make your 9 squares even with clean edges. We don't cut our biscuits in half...we crumble. It tastes better. Really!


You may never see it crumbled in a magazine, but the little bits soak up all the delicious juice from the berries and you don't get a mouthful of biscuits with no strawberry flavor. I fill up a plastic freezer jam container with sliced strawberries and sugar and that is enough for four servings of strawberry shortcake. I just take the container out of the freezer the night before we want to eat it. I use about a cup of whipping cream with 2T powdered sugar added for the topping. Don't spoil your strawberry shortcake with Chemical Whip! :)


You may find yourself snacking on the biscuits late a night, sans strawberries. To avoid this dilemma you can wrap the biscuits in foil, place them in a freezer bag, and freeze them until the next time you want shortcake (or a snack). They'll be beautiful from the freezer for about 3 months.

Enjoy!

09 July 2009

3-2-1 Chicken

3-2-1 Chicken is a recipe handed down from six generations of the Sunshine family...just kidding. Some woman in a grocery store told this recipe to my mom when she was buying Montreal Steak Seasoning one day. :) It is ridiculously simple, but crazy flavorful. Best of all, no oven. It is crazy, sticky hot here and I refuse to turn on my oven. Which means I have not been baking and have had to look for other stress relievers...like playing Lego Star Wars with Tinker Bell.

For this ludicrously easy recipe you will need:

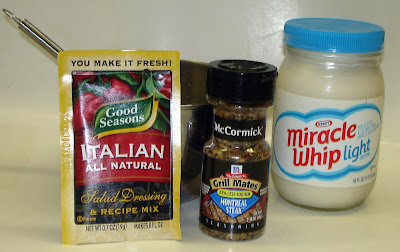
3T mayo (I use Miracle Whip, which is called mayo in the South)
2T Italian dressing (I make my own)
1T Montreal Steak Seasoning (lower sodium if you are watching your salt intake)
4 skinless, boneless chicken breast, cut into 3 strips each

(I usually double all of the ingredients so that we have lots of leftovers. I love to feast on cold chicken out of the fridge.)


I make my own Italian dressing using the Good Seasons dressing mix. Two mixes come with a free cruet, which I use for my homemade vanilla. Works perfectly and then I just mix up the dressing in a bowl. But any Italian dressing will work.


After I clean and cut my chicken I put it all into a plastic bag. I mix up the mayo, dressing, seasoning in a bowl and then pour it over the chicken and let it marinade for at least a few hours, overnight is not necessary.


I used to make this on my George Foreman grill, but it started smelling like burning plastic every time I turned it on so I threw it out. I miss it, tho. Now I make the chicken in an electric skillet on medium high heat, about 5 minutes on each side.


You can make this in the oven (350 for 20 minutes) or on the grill outside. So easy, so quick, and SO tasty no matter how you cook it.


Enjoy!

02 July 2009

Flag Cake

As the 4th of July holiday approaches picnickers and backyard bbq-ers all across the nation frost their sheet cakes and decorate them with blueberries, raspberries, and even strawberries. The red, white, and blue Flag Cake is a unique American tradition. Even non-bakers can throw together a box cake and slap on some berries. It really could not be easier! It is also the perfect project to let your kids help with--and you can feel good about encouraging them to eat the decorations as they help. So, make your favorite cake from the box or from scratch, make some buttercream or open a tub of white frosting, and wash some blueberries and raspberries (or strawberries if you prefer)--make sure you get them really dry so they don't leak all over the cake.


You will need:

a rectangular cake (size doesn't really matter...hee hee)
white frosting to cover the cake
blueberries
raspberries (or strawberries)


If you are familiar with my blog then you know I didn't use a box cake. I made Martha Stewart's flag cake, which uses her white cake recipe. I didn't change much. She used a 12x18 inch sheet cake pan and I didn't have one and couldn't find one at Wally Mart, so I just used a 9x13. It was perfect!


I used buttercream instead of her cream cheese frosting because we aren't cream cheese people. You will probably get a truer white from the cream cheese, but I used Smart Balance sticks, which are pretty yellow and my frosting still came out white. I do recommend giving her white cake recipe a try. It was unbelievably tender and so, so yummy.

I followed her directions. She recommends using a toothpick to outline the flag on the cake. Super easy.


Now call in the kiddies and show them where to place the raspberries. I did the first stripe for them to give them a better idea how to line them up. Then I left them alone and let them have fun.


We didn't try to line up the blueberries at all after the initial outlining. We just took handfuls and pressed them into the frosting.


Boy, oh boy is this cake delicious!!


You will definitely want to store it in the fridge until you are ready to eat it. We dug in right away. :) I would not recommend applying the fruit the night before. Even if you get them super dry, the natural juices tend to leak out after a few hours. The juices give the cake an excellent flavor, but they don't do much for the presentation. We didn't have much left to store in the fridge overnight!


I'll leave you with the perfect bite. Enjoy!